


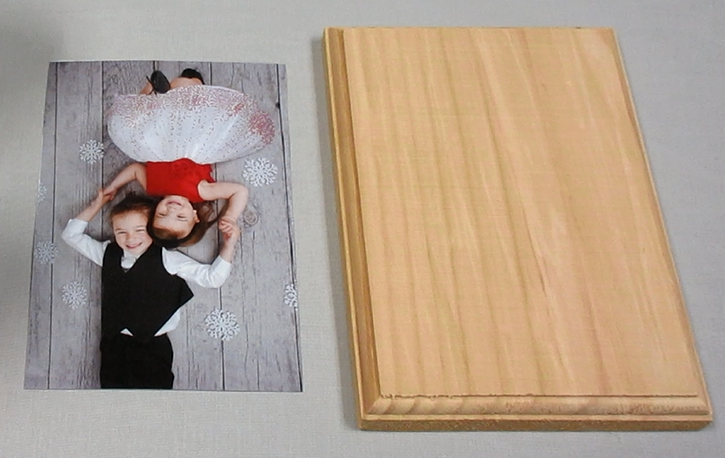
Learn how to easily transfer any photo onto a wood plaque. This DIY craft activity is great for making holiday keepsake gifts!
Materials:
- Wood Plaques
- Mod Podge
- Paintbrush
- Craft Heat Tool (or hair dryer)
- Printed photo
- Water
Video Tutorial:
Written Instructions:
Step 1: Choose the type of wood plaque you’d like to use for this project. Our pack comes with 4 shapes – oval, round, square, and rectangle. Then choose a picture, re-size it to 1 inch smaller than the plaque dimensions (we used the medium rectangular plaque, which is 5×7, so our photo is 6×4), print it on regular printer paper, and cut out the image.
Step 2: Apply a thick coat of Mod Podge to your plaque using a paintbrush. Be sure to cover the whole surface. Brush the Mod Podge around in different directions to get a smooth and even coat.

Step 3: Carefully place the picture face down onto the center of the plaque. It is important to make sure there are no bubbles or creases, and the paper is securely stuck to the plaque.

Step 4: Use a heat tool to dry the Mod Podge under the paper. This speeds up the process so you don’t have to wait the usual 24 hours for it to dry. Apply the heat for 3-4 minutes. Be sure to distribute the heat over the paper evenly.

Step 5: Fill a cup with water. Use a paintbrush to apply water onto the paper. Spread the water evenly and let it saturate the paper. Once you see it starting to soak through, then you can start the process of removing the paper. Use the pad of your finger to gently remove the paper so the image starts to show through. This step is a bit messy and can take some time, but don’t rush the process or you could ruin the picture. When you have most of the paper off, you can add some more water with a paintbrush to get the residual pieces off of the plaque. Let it dry. It will start to look a bit whity and fuzzy.

Note: In areas where you rub the paper with a little more pressure, you will notice some of the photo rubs off. This can give the plaque a nice vintage look when you are finished. You may choose to do this to areas you don’t mind looking a bit faded, like the outer edges.
Step 6: Seal the plaque with another coat of Mod Podge. Apply a thin layer with a paintbrush and smooth it out.

Step 7: Use the heat tool again to dry the Mod Podge for about 1 minute. You will see the photo dries clear! Now your plaque is ready to display.

We hope you enjoy making these as much as we did! They make such great holiday gifts. You can also make them into ornaments to hang as an indoor decoration.
Alternatives: If you want to create a simpler design, you can use Mod Podge to apply the photo directly to the plaque. Below is an example that one of our associates created using our circle plaque.


Pingback: 24 Lovely Mother's Day DIY Photo Gift Ideas
Pingback: 81 Crafts to Make and Sell for Profit | IdeasToKnow
Pingback: 87 Crafts You Can Make and Sell as a Stay at Home Mom - My Hub List
Can you please help me. I used the instructions you have given. I have failed times two. I believe my 1 st attemp I rubbed to hard in a couple of spots. It took off to much ink. My 2 nd attempt I had a lot of spot that the ink didn’t stay on the wood. Both attempts were colored photos that I had printed with a laser printer on regular paper. I felt like I lost alot of the colors from the phot.
Hi Linda, yes you do have to make sure you rub the paper very slowly and gently. We added water and let it seep in a bit each time adding more water and rubbing very slowly. You do lose some of the photo, ours has frayed edges as you can see from the photo. Did you use enough Mod Podge on the wood so that the photo stuck to it well? And what heating tool did you use?
Back when I learned to do this, the instructor told us that a laser jet wouldn’t work as well because the dry toner powder won’t transfer like a pigment ink in an ink jet printer. It’s been close to 8 years since I took the class, so maybe things have changed? I only have a laser printer now, but reading this makes me want to give it a go. Not sure if this helps but thought I’d share. Happy transferring!
Can I use same procedure to transfer coloured photos onto mirrors and plastic surfaces?
I tried this and all steps worked perfectly until I had to apply water . It won’t eat through and I have been doing it for.15 min. What am I doing wrong ?
Hi Claudette, what type of paper and printer did you use for your image? The paper should start to saturate and you should be able to lightly rub it and have the paper start to come off in pieces.
Pingback: 20 Crafts to Make and Sell Online | Coupon Queen
Pingback: How to Mod Podge on Wood: 5 Basic Steps - WoodWorks Hub
Do you think this would work on any wood?
Please tell me what wood and mod podge did you use? Are Amazon wood good to use?
Hi Dalisha, this is the wood plaque assortment we used: https://www.ssww.com/item/unfinished-medium-plaque-assortment-WP37/. It does come with several pieces. The activity should work with any unfinished wood plaque. The Mod Podge we used is currently unavailable but here is the link: https://www.ssww.com/item/mod-podge-decoupage-finish-PT3242/. We are hoping to have it back in stock soon.
Can you use a regular picture in place of a printer photo?
Hi LouAnn, unfortunately you cannot do a photo transfer with a regular picture. The ink from a printer is what gets transferred onto the wood. Even if you used the Mod Podge method at the end of this blog, a regular photo is too thick to stay on the wood.
Thank you. Another question: can you use an inkjet photo?
I did something similar to this technique. I found that applying a layer of Elmer’s glue then thin layer of mod podge before printing. The Elmer’s glue helps remove the paper better and heating after applying paper to wood helps keep image intact with wood. Exposing too much heat will cause mod podge to bubble.
You used both glue?
Can you used photo paper to transfer the photo into the wood? Or it has to be an actual print photo with a regular paper
What type of printer picture is used here inkjet or laser jet printed paper picture?
Hi Anne, this was printed with a laser printer (high volume for a business environment. It comes out much better quality than an inkjet printer. You can still use inkjet, if you search Google for the type of printer you have and the phrase “photo transfer” you can find some tips for using an inkjet to make it come out better. If you place the photo face up, you can use any type of photo as you are just adding Mod Podge to it.
Hi there, It is very good idea. I have a question is it possible to replace Mod Podge with other stuff? There is no Mod Podge in my country.
Hi there, I did a Google search and found that some people make their own Mod Podge with glue and water. There are also sites that mention PVA glue as an alternative. I have not tried any of these options. Hope that helps!
Hi! Can I seal it with poly afterwards? Another question can I stain around it or can I use painters tape
Hi Marianne, we have not tested poly as a seal for this wood photo transfer craft, only Mod Podge. After doing some research online, it seems others have used this successfully for wood transfer projects. Painters tape should be fine to use, just make sure the type you get is ok to use on wood. If you plan to stain the wood, you may want to do this carefully as it could stain the photo since you are doing it before you seal it. Hope that helps!
Hi there, will this work with a regular photograph instead of printing the photo onto paper?
Hi!
To make something like the circle photo, you simply apply mod lodge and put the picture facing up (opposite direction than the rectangle plaque?) and then apply more mod podge?
Hi Emily, yes that is exactly right! Apply mod podge on the round wood plaque first, then place the photo face up. Then apply another coat of Mod Podge over the photo. We would love to a photo of how yours came out!
Your directions are spot on!
Question- If I printed out a phrase that I’ve inverted…will the words transfer, or just pictures? I’m thinking words would too, since its the same ink/paper/printer as you used.
Thanks in advance!
Thanks Dawn! Yes the words will transfer, it just may be a bit more difficult because you have to make sure you don’t rub the paper too hard in that area so you can’t read it. For the images it’s ok if it has a weathered look, but you want the words to be clear. Make sure the font is thick enough and you should be ok. We would love to see a photo of the finished project if you are willing to share!
Will any kind of photo work or do you need certain paper for transfer or face up? Thanks
Hi Barb, we used a laser printer for the transfer and it comes out much better quality than an inkjet printer. You can still use inkjet, if you search Google for the type of printer you have and the phrase “photo transfer” you can find some tips for using an inkjet to make it come out better. If you place the photo face up, you can use any type of photo as you are just adding Mod Podge to it.
Can you use a blow dryer as your hearing tool or what was the heating tool you used?
Hi Jaime, unfortunately the heating tool we used is no longer available, but you can use a hair dryer on a low setting, just do not hold it too close to the paper. Using a heating tool speeds up the drying process.
I don’t have a heating tool, would a hair dryer work instead? Or could I just let it dry for 24 hours??
Hi Kelly, yes you can use a hair dryer on a low setting. You can also let it sit and dry overnight but the heating tool just speeds up the process.
2 questions:
1. Could this be done on piece of painted or sealed wood?
2. The circle photo you showed: how did you do that? Just stick on and then cover with Modge Podge? I’m thinking that might work better with a painted/sealed wood surface.
Hi Jessica, we have not tried the photo transfer on painted/sealed wood. It may work because you put the Mod Podge layer on the wood first before starting the transfer, and that is what facilitates the photo transfer. But we can say for sure that painted/sealed wood will work if you do the method we used for the circle photo. For this, we spread Mod Podge on the wood, placed the photo face up, then spread more Mod Podge over the pohoto.
Thanks so much for the quick reply. This is very helpful!
Pls tell me the type of wood plaque you used for portraying the picture ? Also recommend how to perfectly remove paper from pic
Hi Heli, we used the medium sized plaques in this assortment, it measures 5×7 https://www.ssww.com/item/unfinished-medium-plaque-assortment-WP37/. The video in the blog post shows how to remove the paper, you use water and your finger to carefully remove the paper. It will come off in pieces and make take awhile to remove completely, but the finished result is so nice!
Hi! I tried this and it didn’t work 🙁
Hi there, can you let me know what went wrong when you tried this craft? Did the photo not transfer?
Yes the photo didn’t transfer. I printed a 4×6 from Walgreens.
I believe you are supposed to print the picture with regular printing paper.
I also tried this a couple of times, one the picture hardly stayed on the wood using regular Mod Podge, next time using photo transfer mod podge when slowly rubbing off the paper it felt like a plastic film on the wood. Is it supposed to be like that?
Hello! I love this idea! I was wondering if a picture in a magazine would work?
Hi Daphne, so great to hear you love the activity idea! It makes such a great gift idea. Yes you can apply this same concept to a magazine picture. Because the maganize page is going to be a bit thinner and easier to rub off than paper, use smaller amounts of water so the image does not bleed and be careful as you rub with the pads of your fingers. Take your time, and don’t worry if you do rub a bit of the image off. It will give it a weathered look.
Very good 👍
Pingback: 5 Father’s Day Gifts Your Kids Can Make - SmartSitting Blog - SmartSitting Blog
Pingback: 20+ DIY Photo Gifts That Are Super Easy To Make
Pingback: Top 11 DIY Wood Crafts to Decorate - S&S Blog